3D Pop-Out Photo Prompt for ChatGPT | AI Prompt King
Create a realistic 3D pop-out photo with ChatGPT. Copy the prompt, upload your photo, and make subjects break out of an elegant ivory frame.
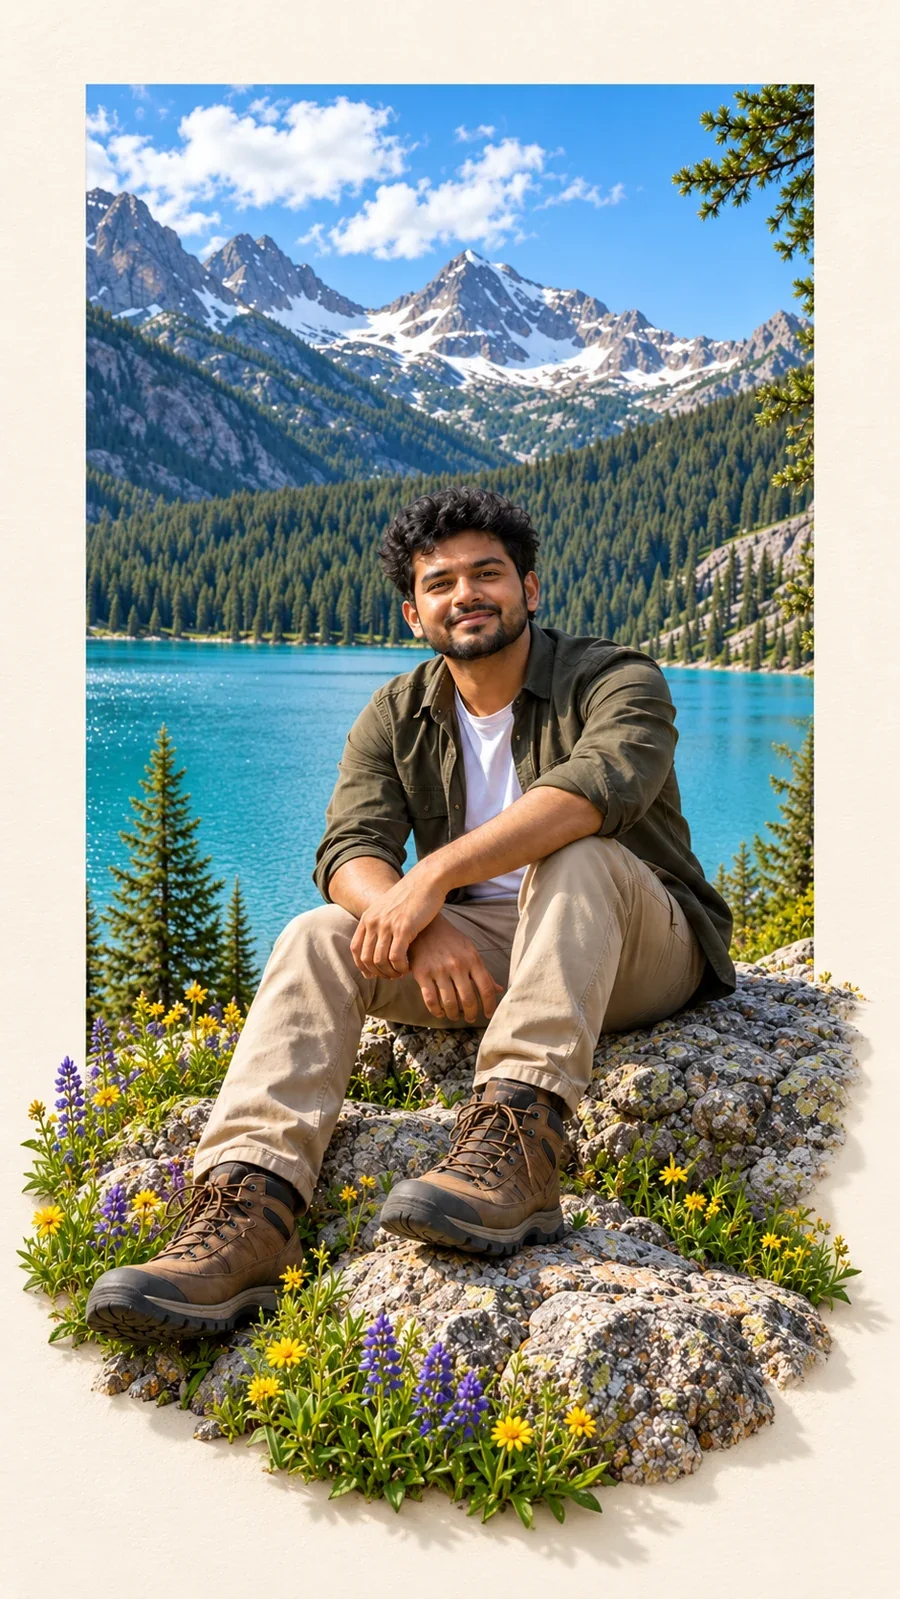
Illustrative cover; not a verified result from this prompt.
Read the full prompt
Edit the uploaded photograph into a photorealistic 3D pop-out editorial photo composition. This is a still image, not a video. IDENTITY AND ORIGINAL PHOTO Use the uploaded person as the only subject. Preserve their recognizable face, apparent age, skin tone, hairstyle, expression, outfit and body proportions. Preserve the original pose and the main setting unless a small perspective adjustment is necessary for the frame effect. Do not replace the person with a generic model. Do not add another person, duplicate limbs or invent accessories. FRAME AND LAYOUT Create a vertical 9:16 canvas with a warm ivory background. Place the main photograph inside one clean upright rectangular photo window. Leave an elegant ivory border visible on every side, with a slightly larger margin below the photo. Use restrained editorial styling rather than a thick ornate picture frame. THE POP-OUT EFFECT Keep the subject's head and upper body naturally integrated with the scene inside the photo window. Let the nearest lower-body foreground elements, such as shoes and the rock, step or seat beneath them, extend across the lower edge into the ivory margin. Preserve believable geometry and depth: those foreground elements must visibly overlap the border, not appear as a second pasted photograph. Where suitable, let a few nearby leaves or flowers extend just beyond the lower corners. Keep the face clearly visible and the full composition inside the canvas. LIGHT AND REALISM Match the original photograph's lighting and perspective. Add subtle, physically plausible contact shadows from the overlapping foreground onto the ivory surface. Use realistic skin texture, fabric detail and fine edges around hair, hands and footwear. Keep the background photograph detailed but avoid excessive sharpening, exaggerated glow or plastic skin. OUTPUT One polished high-resolution image, vertical 9:16. One person, one photo window, one continuous scene. No text, logo, watermark, interface elements, social-media notification or additional collage panels. Do not crop off the head, fingers or shoes. If the input is only a tight face crop, preserve the visible person and use a restrained shoulder or hand overlap rather than inventing an entire unrelated body.
Turn an ordinary portrait into a 3D pop-out photo: the picture sits inside an ivory border while the shoes, rock and small foreground details appear to extend beyond it. This guide includes a copyable ChatGPT image-editing prompt and an original AI-generated travel example. The sample uses a fictional traveler; it does not use the reference creator's face.
What is a 3D pop-out photo?
This is a still-image depth illusion. Part of the scene stays inside a rectangular photo window, while selected foreground objects overlap its edge. Small contact shadows help those objects feel connected to the border. It is sometimes called a frame-breaking photo effect or an out-of-bounds photo edit.
The result works best when the overlap has a clear reason: boots resting on a rock, a hand close to the camera, or a few leaves in the foreground. A border alone does not create the effect. The foreground must cross the border while the rest of the photograph remains visually continuous.
What you need
- A clear photo that you own or have permission to edit.
- A ChatGPT account with image creation or editing available.
- The master prompt on this page.
- A full-body or seated portrait with visible foreground details for the strongest result.
A face-only selfie can work for a smaller shoulder or hand overlap, but it does not establish the person's unseen outfit or full body. A seated travel portrait is a practical starting point because the feet, seat and ground give the model useful depth cues.
How to make the effect in ChatGPT
- Copy the full prompt from this page using Copy Prompt.
- Open ChatGPT and start a conversation with image editing available.
- Use the attachment or plus control to upload your photo.
- Paste the prompt into the same message and send it.
- Wait for the image to finish. Check the face, hands, shoes and frame edges.
- Open the finished image and use Save or the available download control.
The button labels and placement can differ between the website and mobile app. OpenAI's Images in ChatGPT guide explains image editing and saving. Availability and usage limits depend on the account; this guide does not promise unlimited free generations.
Get the prompt from AI Prompt King
You can find this guide on the AI Prompt King website by searching for “3D Pop-Out Photo”. The Android app is another way to browse the prompt library. Open AI Prompt King on Google Play, install the app if you want to use it, and search for the same topic. If an app version has not refreshed its listings yet, use this website page.
The tutorial's Instagram profile is @rahulgaur3d. AI Prompt King is the website and app name. The profile's APP LINK leads to the app listing.
Choose a photo that supports the effect
- Seated travel portrait: include both shoes, the seat or rock, and some space around the subject.
- Standing portrait: keep the complete body visible and choose a low foreground element that can overlap the border.
- Close portrait: use a modest hand or shoulder overlap rather than asking for an invented full-body scene.
Avoid heavily blurred faces, cropped fingers, crowded groups and extremely wide-angle selfies for a first attempt. Clear lighting and a simple subject outline make the border crossing easier to inspect.
Alpine travel example
Our sample shows a fictional traveler wearing an olive overshirt, a white T-shirt, beige trousers and brown boots beside an alpine lake. The upper part of the photograph remains inside the ivory window. The boots, mossy rock and nearby flowers extend into the lower margin.
The source and finished example were generated for this tutorial. They illustrate the intended design, not a guarantee that every input photo will produce identical details on the first try.
For a similar travel setting, append this optional instruction to the main prompt:
“Keep the person seated on a mossy lakeside rock. Preserve the turquoise lake, pine forest and distant mountains inside the photo window. Let the nearest boot, the front of the rock and a few small wildflowers overlap the lower ivory border. Keep the lighting soft and natural.”
Use that setting only if you want to change the background. To retain a real location from your own photo, keep the main prompt's instruction to preserve the original setting.
Fix a result without changing everything
If the subject looks pasted on, ask: “Match the light direction and color temperature across the person, the photo window and the foreground. Add only subtle contact shadows where the foreground overlaps the ivory border.”
If the face changes, ask: “Restore the uploaded person's facial proportions, hairstyle and expression. Keep the frame composition and outfit unchanged.”
If the border is hidden, ask: “Make the ivory frame clearly visible around the top and both sides. Limit the pop-out overlap to the lower foreground.”
If hands or shoes are distorted, identify the exact defect in the follow-up. Request one targeted correction and inspect the new result at full size. Do not assume a prompt can guarantee perfect anatomy or identity.
Export and use it in a Reel
Request a vertical 9:16 image when you intend to show it in a Reel or Short. Keep the subject and important frame edges away from areas covered by captions or app controls. A short before-and-after reveal makes the change easy to understand.
The master prompt creates a photo. A camera move, animated wipe or before-and-after transition is a separate editing step. If you animate the still later, keep the motion gentle so the border and foreground remain easy to read.
Frequently asked questions
Does the prompt create a video?
No. It creates or edits a still image. The tutorial adds motion to the before-and-after presentation in the video editor.
Can I use a different person or location?
Yes. Upload your own suitable photo and keep the identity-preservation instructions. Use a photo you have permission to edit. You do not need the reference creator's image.
Why does the effect sometimes look flat?
Usually the foreground does not visibly cross the border, or its shadow and perspective do not match. Ask for a small, deliberate lower-edge overlap instead of making the entire person float above the photo.
Will the result go viral?
No prompt can guarantee views. A clear example, useful instructions and a clean presentation help viewers understand the effect. Judge the image quality before posting.